HLT Control, Hardware – Raspberry Pi

So, continuing on from my previous post on starting to use the Raspberry Pi for brewery control, this is a post about the interface aspects of HLT control. There’s a bit of circuitry here to interface the GPIO ports of the Pi to a mains powered element – the Pi shouldn’t be switching mains voltages and currents without some isolation – there’s far too much risk involved, both for the Pi and for the brewer...
Usual, obvious disclaimer – folow these instructions at your own risk – you are responsible for your own actions; if you’re unsure, get someone to check it for you. Equally – if there’s a mistake here, let me know and I’ll correct/change the details below.
A few bits of background – the output from the 3.3V ports on the GPIO header is about 50mA total across all the ports. While fine for driving one LED, we’ll probably need some extra current from somewhere to drive items such as relays. We’ll also most likely need something at a slightly higher voltage than 3.3V for switching – we’ve got the option of using the 5V supply from pins 2 and 4 of the GPIO header, but even that might be a bit low (and care is needed not to short those to a 3.3V port as it’ll blow it).
So the approach I’ve taken here is to design the circuit to do the following:
GPIO > Transistor Switch > Optocoupler > Relay
The transistor switch gets round the issue of having insufficient current to drive the optocoupler input as we can switch the 5V supply from the board with a very low base current through the transistor (and there’s about an amp available for the 5V supply – more than enough to drive an optocoupler at about 20mA).

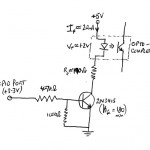
Fig. 1 shows the circuit to drive the optocoupler. the 4.7kΩ resistor ensures that a very low current is pulled from the GPIO port to the base of the transistor (pretty much any NPN transistor will do here – I have a pile of 2N3415s so I’ll use those...). The 47kΩ resistor between base and emitter is a pull-down and ensures the base is pulled to ground,though there’s also software handling for this in the Pi.
When the GPIO port is high, the transistor will be in saturation, and that will allow current to flow from collector to emitter – the 190Ω resistor will restrict the current to 20mA as per the optocoupler spec. If we want an indicator LED here, we can account for the extra 1.8V drop across the second LED in series and change the resistor to a 100Ω. The 20mA will turn the optocoupler output on to drive the 12V circuit.

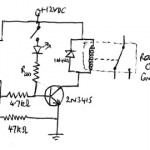
The optocoupler provides isolation from a 12V circuit used to drive the relay coils, and this again has to use a transistor switch to allow sufficient current to drive the relay coils – the optocoupler has a maximum current of only a few mA (~3mA design current) which is insufficient to drive the relay coil that needs 40mA at 12V. When current flows through the optocoupler collector/emitter, the transistor is switched on and current will flow through the relay coil. Note there is a protection diode connected across the relay coil to allow voltage spikes when the relay is switched off (from a rapidly collapsing magnetic field) to be dissipated relatively slowly through the coil.
The switch, LED and resistor at centre allows for a manual override of the optocoupler circuit to switch on the relay regardless of the pin output from the Pi – useful for heating water even if the Pi is unavailable or if the controlling code doesn’t think it should be on! The LED gives a suitable indication that it is on – might be possible to have an illuminated switch here that is lit when on.

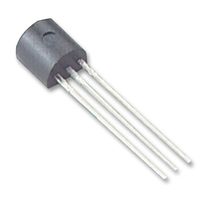
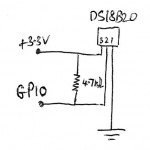
The temperature sensor is the easiest circuit of all to connect – we’ll be using the DS18B20 1-wire chip and using the 1-wire driver for this chip as per the previous post . On the 1-wire DS18B20, connect Power (pin 3) to the 3.3V supply on the Pi; connect Data (pin 2) to the GPIO port to be used for the input, making sure we have a 4.7kΩ pull-up between Power and Data; and Ground (pin 1) to ground.
Short of connecting everything up and adding the relay into the mains circuit driving the heating element (making sure the contacts have a high enough rating!), as well as working out a thermowell-type arrangement for the DS18B20 sensor, that’s the hardware side taken care of. I’ll try and find a nice case to put it all in – this also gives me the option of having all switches and displays in the same place at a later stage. It goes without saying, check the circuit before connecting the element – with a mechanical relay you’ll hear it clicking. You can check outputs at each stage using a multimeter. You might also like to have a float switch somewhere here to prevent the element switching on when the HLT iis too low on liquid. This could either be included in the above circuit, in series with the input side of the optocoupler, or feeding an input pin on the Pi which allows us to raise an alarm in the software, with a suitable logic check on this pin before switching on the element.
Next up, some code to pull the temperature and switch the signal pin on and off...
0 Comments on “HLT Control, Hardware – Raspberry Pi”